

Everything About
Laser Welding!
Heliner LaserWeld NZ is here to help. We’ve prepared everything you need to get started, including health and safety, setup instructions, and the best parameters for achieving the perfect weld. All procedures and information follow the most up-to-date New Zealand health and safety standards. Don’t hesitate to call us if you’d like further assistance!
What Laser Welding Parameters Should I Use?
Achieving a perfect weld requires fine-tuning. LaserWeld NZ machines feature four main adjustable welding parameters, in addition to other advanced parameters. In the next section, we’ll explore the main four, their effects on the weld, and our base recommendations for different materials and thicknesses.
If you’re already familiar with laser welding, then the following table is LaserWeld NZ’s recommended starting parameters for testing, from which experienced laser welders can optimise and fine tune:
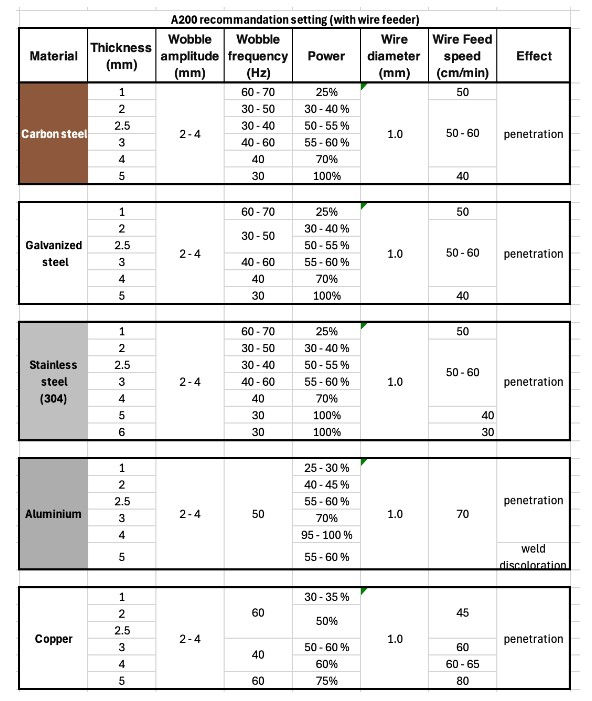
So what do each of these parameters control?
Power is the amount of energy delivered by the laser source during welding.
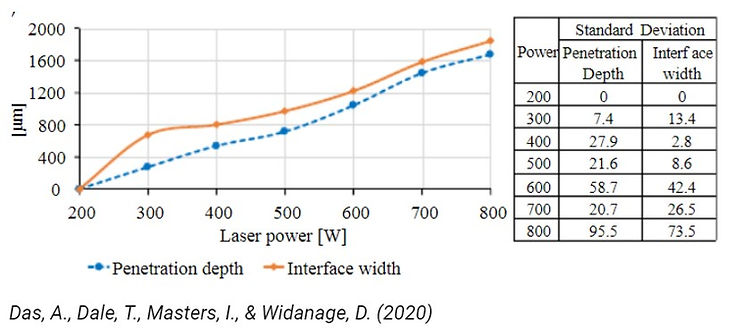
Higher power settings provide deeper penetration into the material. This is essential for achieving strong structural welds in thicker materials, but can burn through thinner ones. This relationship is explored below:
More power increases the amount of heat put into the material. This can cause chemical and structural changes to the welded area which can introduce brittleness and warping or leave residual stresses.
Higher temperatures also allows the material more time to remain molten, making proper fusion between the base metal and filler metal more likely. Laser welding is a more efficient process than traditional TIG or MIG, with less heat put into the material for the same strength welds.
How do I know if the power is too high?
Here are common signs that your power setting is too high:
1. Burn Through: The laser melts completely through the material, leaving a hole.

Note: If burn-through is occurring only at the start and/or end of the weld, you may need to adjust the starting and/or ending power levels, as well as the transition times between these phases, known as the rise and fall times.

To make these adjustments, go to the [Auxiliary Settings] on the main screen, and modify the rise time, fall time, and start/stop power
2. Distortion/Warping: Heat causes the material to bend or deform as it cools.
3. Excessive Heat Affected Zone: The discoloured region around the weld is larger than expected. Note that laser welding generally gives a smaller HAZ, and should adjust your expectations accordingly.

4. Collapse: The weld bead caves in as the material underneath loses structural integrity from too much applied heat. This affects the shape and thickness of the weld, reducing the strength of the joint.
Note: Collapse can also be caused by a low wire feeding speed. We cover this in more detail later
5. Spatter: Molten material splashes out of the weld, and fuses to the surrounding metal.
6. Oxidation/Discoloration: The material or weld surface changes colour due to excessive heat exposure.

How do I know if my power setting is too low?
Make sure the focus distance is right and both lenses are clean first!
The focusing lens sets the focus distance, where the light is most concentrated. The tip of the nozzle, where welding occurs, should be exactly at this distance. Many of the problems of insufficient power will be mimicked by an incorrect focus distance. Likewise, use the red dot indicator to ensure both lenses are clean and free of debris that can scatter or reflect the laser light. See the maintenance section for more on both of these processes.
1. Lack of fusion (Cold Weld): Occurs when the laser welder doesn’t generate enough heat to properly melt and fuse both materials. It is often visible as gaps or discontinuity in the weld line, irregular bead shape, cracks, or a cold/matte appearance on the weld bead.

Insuficcient power is one of many potential causes of a cold weld, so before adjusting it, ensure:
-
The welding wire diameter is thick enough for the material you are welding.
-
The material surface is clean and free of rust.
-
The gap between the parts you are welding is not too large.
For laser welding, cold fusion is most common for thick mild steel parts, and users should take special care to properly prep these parts before welding.
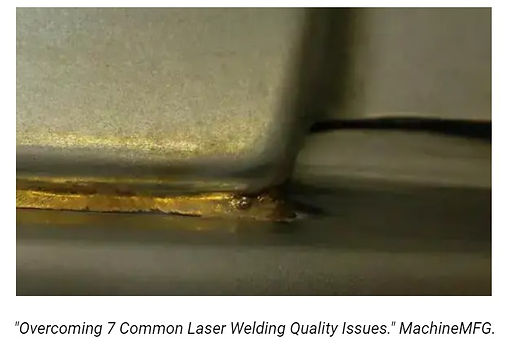
2. Lack of Penetration: This occurs when the laser power is insufficient to penetrate the full thickness of the material, leading to incomplete fusion and a weak weld. Inspect the back side of the welded plate—if there is no visible weld or only a faint mark/shadow,, the penetration is inadequate and the power may be too low.
Top: Poor Penetration
Bottom: Ok penetration
Note: Lack of penetration can also be caused by excessive welding speed. See below for more details.
3. Porosity: Gas bubbles can form in the pool during laser welding, and if this cools too quickly they can become trapped, creating voids in the joint. This is especially a problem for galvanised surfaces where the coating evaporates during welding.

First ensure you are using the correct shielding gas, and the flow velocity is correct. Ensure the working surfaces are clean with no moisture or other contaminants. One of these is usually the root cause of porosity. Porosity can be a sign of insufficient power as this can exacerbate the underlying issues.
What does the Wire Feedrate Control?
Unlike traditional MIG or TIG, laser welding speed is primarily controlled by the wire feedrate. The wire exerts a force as it feeds, which the operator should not resist, and instead use as a guide for the welding speed.
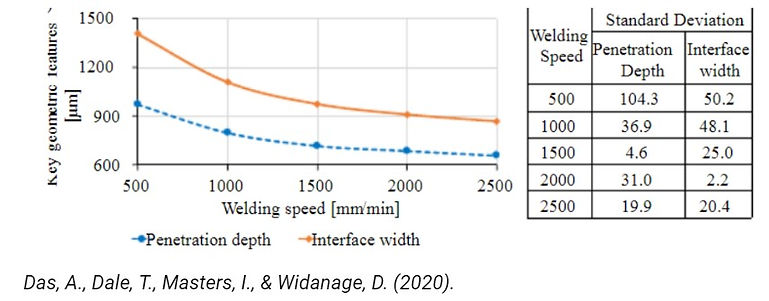
The key relationship is between welding speed and penetration depth. As welding speed increases, penetration decreases because the laser spends less time in a localised area, resulting in less heat being generated for material fusion. Conversely, slower welding speeds allow more time for the laser to heat the material, leading to deeper penetration. This relationship can be observed below:
How do I know if my feedrate is wrong?
Keep a look out for the following issues:
1. Gaps in the weld line
Note: First ensure that the lens is clean and aligned, as this can cause gaps in the weld line.
If the lens is in good condition, the issue may lie in the wire feed rate. A low or inconsistent feed rate, often due to resistance in the feeder mechanism, can disrupt the weld. This resistance is commonly caused by a low feed rate itself.
If increasing the feed rate doesn’t resolve the issue, inspect the feeder mechanism for slippage in the feeder wheels. If slippage is present, adjust the pressure using the red knobs on the feeder wheels. Also, ensure that the correct feeder wheels are being used for the wire diameter, and check the wire feed tube for any kinks or signs of damage that could be causing resistance.
2. Undercutting: If the welding speed is too fast, the wire will not have enough time to properly deposit into the melded material, resulting in underfilling, and gaps along the edges of the weld line:
Local Undercutting can occur at the end of the weld if the power drops too quickly. To fix this, head to [auxiliary parameters] and increase the falling time for the laser stop power.
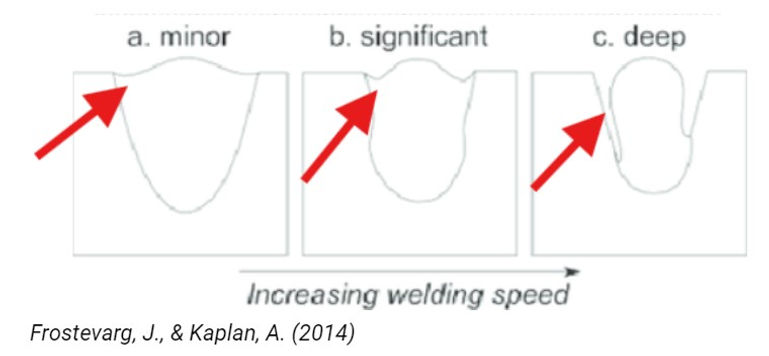
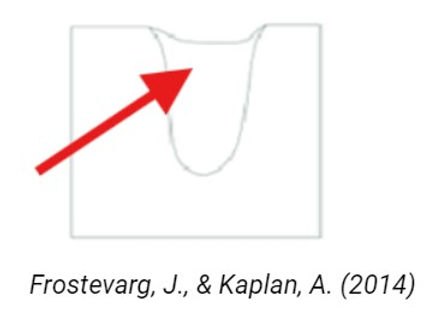
Note: Undercutting can also be caused by an incorrect focus. If the focal point is too deep, the laser may penetrate too far into the material without properly fusing the upper layers. Look for the telltale ‘rounded bottom’ undercutting
3. Collapse: If the wire feed rate is too slow, the laser melts the base material faster than the filler wire can be deposited, and the weld can collapse.
What is Wobble Amplitude and Wobble Fequency?
Wobble Amplitude
The laser automatically oscillates during welding to properly create the weld bead and fill the weld gaps. Wobble amplitude controls the distance of these oscillations, and therefore the thickness of the weld line.
This can be used to bridge gaps between materials, and create a thicker, more evenly distributed weld, but there is a limit based on the thickness of wire, the speed of welding, and the wobble frequency.
Typically, the recommended wire thickness should be slightly below the width of the gap you are trying to weld across - 0.2mm smaller is a good starting point. By increasing the wobble amplitude, it is possible to bridge gaps up to approximately 1.5 times larger than the wire diameter without significant loss of strength.
Wobble amplitude and penetration depth:
Increasing wobble amplitude spreads the laser energy over a wider area, which reduces penetration depth, as the same energy is distributed over a greater area. Conversely, a lower wobble amplitude concentrates the same energy into the central weld zone, giving better penetration but over a smaller area. This relationship can be viewed below:

When to use a higher wobble amplitude:
1. Weld thickness is not sufficient to bridge material gaps. A thin weld line can cause cracks and cold welding.
2. When you want to bridge a wider gap than the wire diameter is rated for.
3. If you find localised overheating: Even if the power settings are correct, a very low wobble amplitude may not adequately spread the heat. This can introduce excessive penetration or other ‘high power’ defects at certain points along the weld line.
When to use a lower wobble amplitude:
1. Higher Speed Welding.
2. Under Penetration: If all other parameters are correct, under penetration can be caused by excessive wobble amplitude, as this disperses the same heat over a wider area.
Wobble frequency refers to the rate at which the laser beam oscillates across the weld seam, working in combination with the wobble amplitude to form the weld bead pattern. A higher frequency results in smaller, more tightly spaced weld beads. Conversely, a lower frequency produces larger, more widely spaced beads.
For most common applications, a higher wobble frequency is preferred. Low wobble frequency welding is often used for small ‘micro’ joints where minimal penetration and distortion are key requirements, and is especially useful when joining plates of different thicknesses.
This type of laser welding is sometimes referred to as ‘fishbone’ welding. As shown below, the top is at 100% frequency, the bottom is at 10% frequency. For most fishbone welding applications, LaserWeld NZ recommends 4-6% wobble frequency.
