

Everything About
Laser Welding!
Heliner LaserWeld NZ is here to help. We’ve prepared everything you need to get started, including health and safety, setup instructions, and the best parameters for achieving the perfect weld. All procedures and information follow the most up-to-date New Zealand health and safety standards. Don’t hesitate to call us if you’d like further assistance!
How do I Keep my Machine Maintained?
If a LaserWeld NZ machine is properly maintained and serviced, it will last you a very long time. It’s best to schedule a yearly servicing with us, but there are two important steps you can take in between to keep things running smoothly.
Clean the air filters weekly. There are four on the bottom of the main body of the laser welding machine, one on each side. They should be removed and cleaned with compressed air.
The protective lens will slowly degrade naturally and should be replaced after approximately 40 hours of welding time (approximately 1 week of regular daily use). It’s also important to check for damage every day using the red LED indicator.
When welding, the most common signs of lens damage will be an unexpected loss of welding power (see the defects caused by low power) or excessive smoke coming from the workpiece.
Lens Damage Check:
1. After starting the laser welding machine, point the laser gun at the ground, 1m from the surface.
2. There will be a red LED indicator light from the gun that forms a red sphere on the ground. This light will appear automatically, and will disappear after 5 minutes if the welder is not used.
3. Check that the light is perfectly spherical (not elliptical) and has no dark spots or lines that could indicate damage or debris.
4. If you notice any of the above, the protective lens will need to be replaced.
Protective Lens Replacement
1. Find the chamber that holds the lens on the top side of the laser gun.
2. Two screws secure it. Undo these screws.
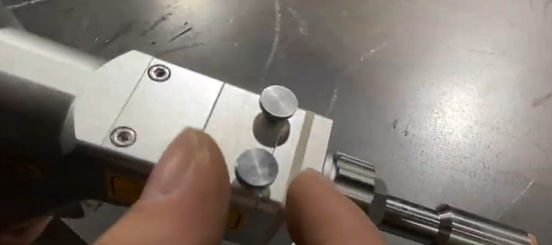
3. Carefully remove the lens chamber, and immediately cover the opening with tape to prevent dust from accumulating in the laser gun.

4. The lens is held in the chamber by a cover. This cover has two ridges on it which slide into a keyway on the chamber to secure it. Rotate the cover until the ridges are no longer in the channel.

5. Remove the lens cover and extract the old lens.
6. Carefully unwrap the new lens without directly touching it. If fingerprints or dust gets on the new lens, it will be unusable.

7. Put the new lens into the cover. Rotate it back until the ridges are secured in the keyway.
8. Put the lens chamber back and tighten the screws.
9. When you put the chamber back, ensure it sits flush with the top and sides of the laser gun. This ensures the new lens is aligned.